With the ever-increasing number of portable electronic ‘necessities’ in our homes and in our pockets, it's easy to find yourself surrounded by unsightly trailing sockets & adapters as we try to stay on top of battery life. With this increase in devices requiring a daily charge, there is a matching increase in products which draw power from a USB outlet, which is fine; if you like carrying a computer with you everywhere you go or losing valuable socket space to a USB-to-UK plug adaptor. Fortunately, there's a winning solution to this problem, It takes less than half an hour to install, and we can tell you how it's done.
 The standard and most common design of USB Socket allows you to make use of your traditional 2 gang 13A plug socket set-up, but with the addition of two USB outlets on a 2A 5V DC Current. For argument's sake that's your phone, your spouse's phone, a laptop, and a television all powered at once from one socket. Not bad. USB sockets now come in a wide variety of colours and configurations, and if you take pride in your decor, finding a match for the rest of the sockets in your home couldn't be simpler with our Screwless Range from ML Accessories.

Or if you prefer a basic white, we recommend the ESR Sline or the Knightsbridge Pure range offerings for their commendable build quality.
Once you've chosen your favourite socket and had it delivered, you can be putting away those irksome trail plugs in under 30 minutes! Note: Electrical work should be left to trained professionals. This article is designed for information & reference and is to be used carefully. If you are not competent with electrical work, please contact a professional to complete this procedure for you. Do not attempt this procedure without experience in electrical installation procedures.


For this project we recommend:
-Insulated screwdriver
-Insulated electrician’s pliers
-A reliable voltage tester
-MCB lock
-Socket polarity tester

You can pick up the entire USB Socket Wiring Kit Here at a reduced price if you need these items to complete this project
Step 1: Plug a radio or lamp into the socket you would like to replace, ensuring the electrics are currently in normal working order. All good? Unscrew your standard socket from the wall and test your voltage meter, making sure this also is in normal working order.
Step 2: Locate your home’s distribution board. (Hopefully the circuit you need to turn off will be labeled. If not, you can turn off the switches one at a time to locate it, or just turn the entire board to the off position.) Turn the circuit breaker switches away from their current 'on' position and lock them off using your MCB lock. You can add a small padlock to this MCB lock to prevent intentional tampering as well as accidental switch tripping. Safety Tip: If you are proceeding with this tutorial without an MCB lock make sure no-one will have access to the circuit board on again or that it is not interfered with in any way. (Locking any doors or access hatches that lead to the board may suffice.) If you have used a radio or lamp to test power plugged into the socket, they should now have stopped working. We recommend a quick check on the connections on the socket again with your voltage tester to check between Live and Neutral and also live and earth to ensure no current is flowing through the circuit.

Step 3: At this point you will need to check the wiring on the old socket and make sure it is appropriately fitted. You should find the following configuration is true: Red/Brown into Live (L) Blue/Black into Neutral(N) green/yellow or bare copper into Earth (E)
Safety Tip: If anything is different than this we recommend you screw the socket back up and call an NICEIC electrician to test why.
Begin to unscrew the power cables from the back of the socket, taking care not to damage them. once you have removed the old socket, set it to one side, and pick up your new USB socket.
Step 4: Connect your new socket using the correct wiring colours mentioned above. That’s Red/Brown into Live (L), Blue/Black into Neutral (N) and green/ yellow or bare copper into Earth (E). 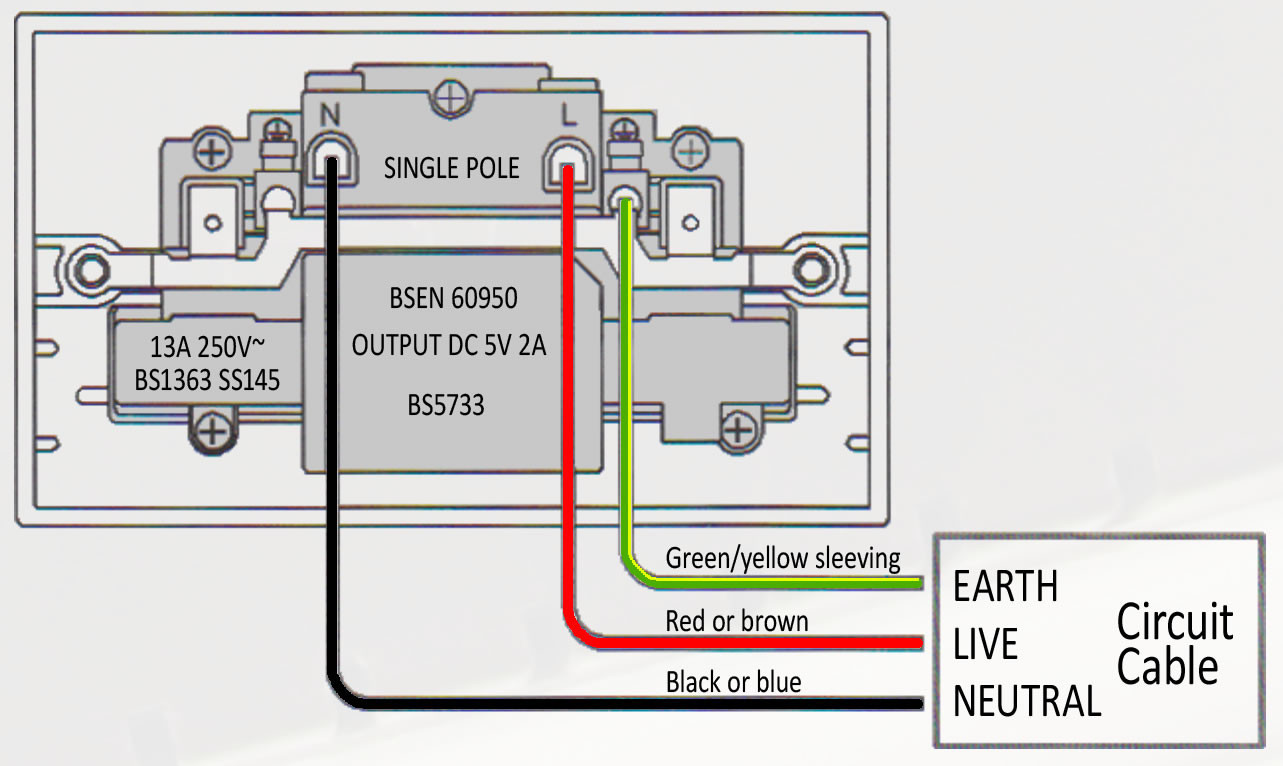
Once you are sure you have matched the cables to the correct terminals, you can now screw the socket back into the wall. Gently place the socket back into the wall cavity, taking care not to damage the cables behind.
Safety Tip: Ensure cables are kept away from the switch screws which tighten your socket to the wall. This is one common issue when the switch screw digs into or goes through the wiring behind the socket and causes a fault.
You can now screw in the socket with the provided screws, and plug in your lamp/radio/test device, and return to your distribution board.
Step 5: At this point, you can return the breakers to the 'on' position. if you used a test device, you should hear/see them now. We recommend using a socket polarity tester to prove your connections are correct and an earth is available at the socket. It should look like this:
It is now safe to use your new USB power outlets in your day-to-day life, enjoy your trail plug-less freedom! Disclaimer: Please Note You should always be or get a competent professional to carry out electrical works.
DISCLAIMER: We recommend using an *approved electrical contractor to carry out this project if you do not have experience in electrical safety procedure. Reader safety is paramount to us, and we always advise to adhere to this information. Any information or advice we provide is provided on the basis you will only carry out any works if you are ^competent and *approved in this field. If you are not *competent and ^approved in the field of work you are trying to do you are doing so at your own risk. *Approved by NICEIC or equivalent. ^Competent - Has relevant experience or qualification in this field of work.


 Hate
Hate
 Dislike
 Neutral
 Like
Like
 Love
Love